GoodBarber's Online Help
Push Notifications - Troubleshooting | Native apps
If you notice that a push was not sent out, start by checking the push history list.
You can find it under the menu Notification > Push > History .
If the status is green, this means that the push was sent to your users properly.
If you have an error:
1. Check all the followings points in this online help, for the platform impacted.
2. Contact the support team , specifying in detail if some of your settings need to be updated in your back office.
Status shows a green badge but the push wasn't received
Remember to check that notifications are authorized on your device :
- On iOS, in your phone settings
- On Android, in the settings page of the application (if you have included this page in your application)
Even if there is no Error notice it is possible that a push showing a green badge was not sent out to recipients.
We must remind you that GoodBarber doesn't handle the distribution of push notifications to recipients, but only sends on the dispatch request to Apple and Google servers. The request is then put on hold on their servers while waiting for dispatch to the recipients.
Android - Check if the Google Console and Firebase project match
In the history, your push shows an orange badge and the mention "Push sent out on iOS and with error for Android".
This means, either that there is an error with your project number or your Firebase project's settings.
1. Log in to your Google console
2. Select your project
3. Check on your dashboard Google what is your project ID
It should match the Google Console project ID in your back office (Publish > Android > Certificates ).
4. Check what is your Project number, you'll need it in the next steps
(There can be an API display error on browsers other than Chrome, we therefore recommend that you use this browser for this check up).
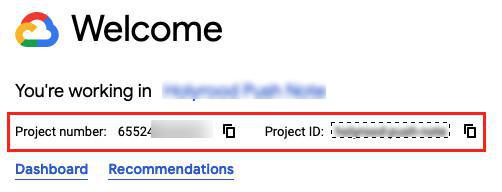
5. Login to Firebase console
6. Check that your project Firebase is linked to your Google Console Project:
- Select your firebase project (created when building your Android app for the first time at step 10 of this online help )
- Click on the icon to the right of "Project Overview"
- Select "Project Settings"
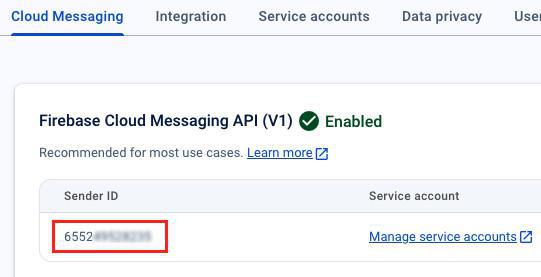
- Click the tab "Cloud Messaging"
- Check if the Sender ID on Firebase matches the Google Cloud Console Project number (see step 4 above)
Android - Firebase Android App
1. Login to Firebase console
2. Select your Firebase project (created when building your Android app for the first time at step 10 of this online help )
3. Click on the icon to the right of "Project Overview"
4. Choose "Project Settings"
5. Click the tab "General"
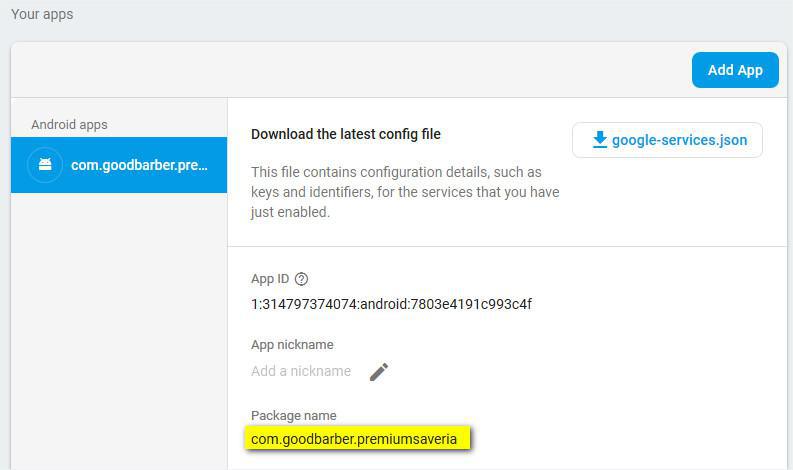
6. Check if the Package nameset on Firebase matches the Package name in your back office (Publish > Android > Certificates ).
Android - Google Cloud Console
1. Log in to your Google console
2. Select your project
3. Go to the menu API & Services > Credentials
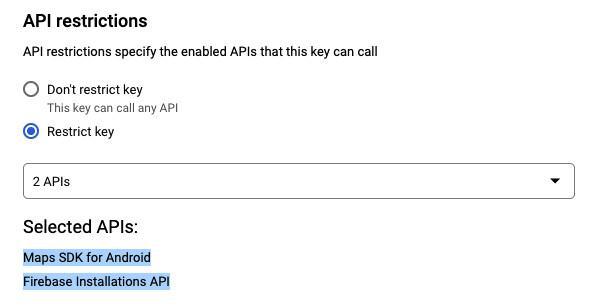
4. Open your Android key and check that you've enabled the 2 following API restrictions:
- Maps SDK for Android
- Firebase Installations API
If you haven't yet, make sure to restrict those 2 APIs and save your modifications.
Android - GoodBarber back office
1. Go to the menu Publish > Android App > Certificates
2. Download both the Firebase configuration file and Service Account file
3. Compare both files and check if the project ID is the same:

Android - Open a support ticket
Once you have checked the points 2 through 5 above, contact the support team specifying in detail the following elements:
1. If Google Cloud Console and Firebase projects number match
2. If the package name is properly set on your Firebase console
3. If the project_id differs on your Firebase configuration file and Service Account file
Depending on your configuration, the support team will give you instructions on how to fix it.
Note: Once the issue is resolved, you will have to regenerate the Android application and send an update to the store, if it was already published.
Dispatch error on iOS
In the case of an error with the iOS push, always check the validity of your certificates in the menu Publish > iOS > Certificates in your backend.
- If the certificate is expired, read the online help regarding the update of your iOS certificates and carry on with the process as described.
- If the dispatch error on iOS remains with the updated certificates, please read on.
iOS - Verify the Push Notification SSL service (Production)
1. Log in your Apple developer account >Certificates, Identifiers & profiles https://developer.apple.com/account/resources/certificates/list
2. In the Identifier menu, select the App ID registered in your backend in Publish > Certificates > iOS
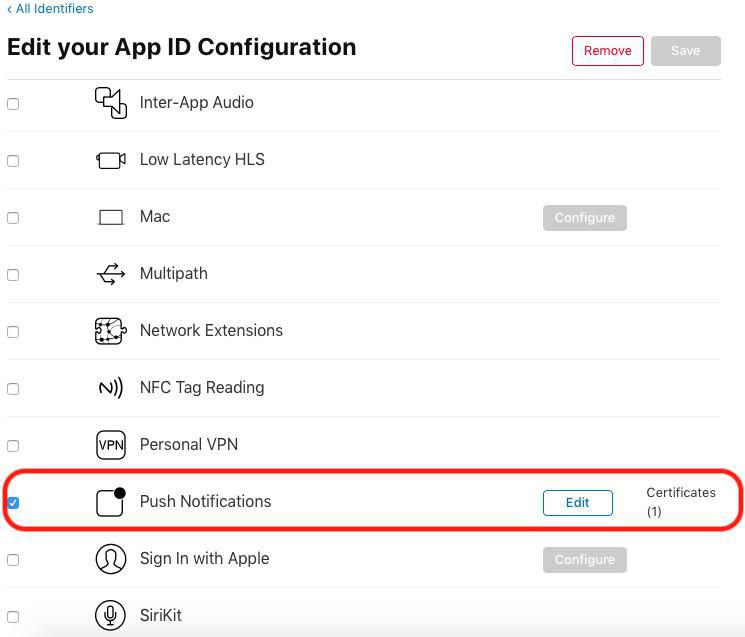
3. Click on the App ID to display the capabilities.
4. Scroll down until you find the line "Push Notifications".
4. Click on Configure or Edit
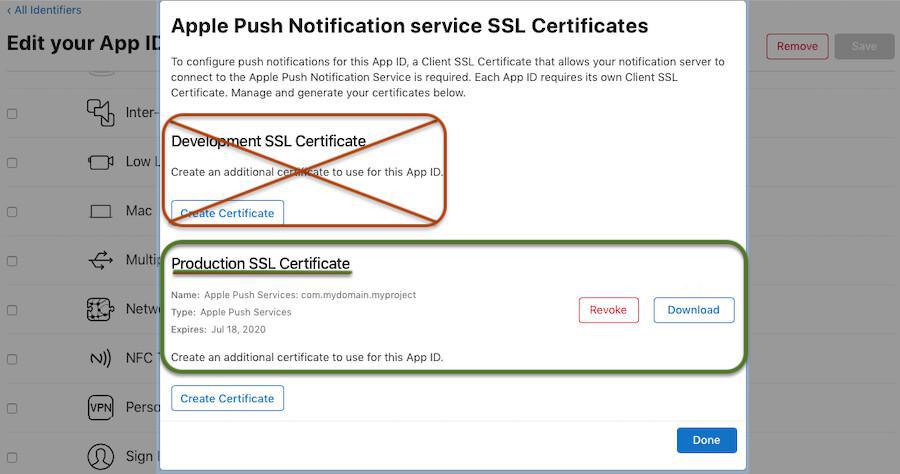
The Push Certificate must be a Production SSL Certificate.
If you created a Development SSL Certificate instead, the push won't work.
To fix this:
- Click on the Revoke button to delete the existing certificates
- Click on done at the bottom of page.
- Follow the online help regarding the update of iOS certificates, starting at step 4.
You don't have to regenerate your iOS application or submit an update of your application to the App Store after your certificates are updated.
- Enable push certificate | PWA
- How to use Push Notifications | PWA
- How to use Push Notifications | Native Apps
- Automatic Push Notifications | Native apps
- Automatic Push Notifications | PWA
- Push settings on users side | Native apps
- Push Notifications - Troubleshooting | Native apps
- Push statistics
- PWA - Firebase Cloud Messaging API update
 Design