GoodBarber's Online Help
Android - Update your app in Google Play
While many content modifications can be managed directly through your app's back office,it's essential to ensure your app remains compliant with Google Play's evolving policies.
To achieve this, we strongly recommend submitting an updated version of your app to Google Play at least four times per year, regardless of whether you've made other changes.
This frequency generally helps ensure your app aligns with Google's latest requirements, including any updates we implement in our build processes. While we strive to keep your app compliant, it's important to remember that Google's policies can evolve, and additional updates may be necessary at times.
By adhering to this practice, you proactively maintain your app's compatibility and avoid potential disruptions, including the risk of app removal from the Google Play Store due to policy violations.
Download the new .aab file
1. Go to the menu Publish > Android App > Publish of your GoodBarber back office
2. Build the application
3. Test the ad hoc version on your Android mobile
4. Click the button "submit my application"
A new page is generated:
5. Download the .aab file of your application onto your computer

Create a release
1. Open the Play Console .
2. Select your app.
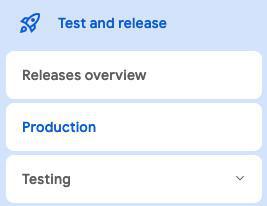
3. On the left menu, select Test and Release > Production.

4. Near the top right of the page, select "Create new release".
Prepare your app's release
Follow the on-screen instructions on the Play console to prepare your release:
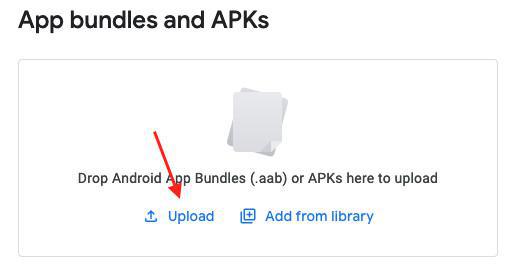
1. Upload your .aab file downloaded previously .

2. Enter release notes:
Let your users know about recent updates you've made in this release of your app.
Release notes shouldn't be used for promotional purposes or to solicit actions from your users.
3. Click "Save" at the bottom of the page.
You have now created a new draft for your new Android app's release.

4. Update all test tracks (if applicable)
If you have existing testing tracks (Open testing, Closed testing, or Internal testing), Google requires you to update these tracks as well, even if they are deactivated. Failure to update all test tracks may result in the rejection of your production update.
- Go to Test and release > Testing in the left-hand menu.
- Create a new release for each of your existing testing tracks (Open testing, Closed testing, or Internal testing)
- Click "Add from library".
- Select the app bundle you uploaded previously for your Production release
- Save it
If you don't have any testing tracks, you can skip this step.
Review and roll out your release
Prerequisite: Before you can roll out your release, make sure that:
- You've set up your app's store listing on the menu Grow users > Store Presence > Store listing
Edit app details and screenshots if needed.
- You've prepared your app for review on the menu Monitor and improve > Policy and programmes > App content.
The full to do list must be completed.
- You've set up your app’s prices on the menu Monetize with Play > Products > App pricing
You can change your app from Paid to Free.
Once your app has been offered for Free, the app can never be changed to Paid.
Once you're ready to roll out your app:
1. On the left menu, select Test and Release > Production :: Tab release
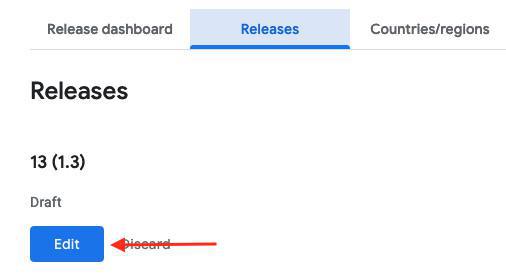
2. Click "Edit" under the app's release draft you've created.

3. Click "Review release" at the bottom of the page.

4. Click "Start roll-out to production" at the bottom of the page.
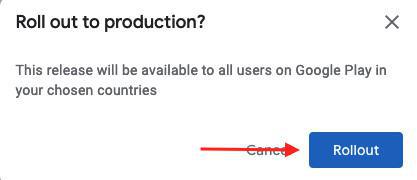
5. Confirm in the Popup by clicking "Roll-out"

Your new Android app version has now been submitted to Google Play, for Google to review it before its publication*.
To check your release status, go to the left menu Test and Release > Release overview of the Play Console.
If there is any issue with the publication of your latest release, Google will email you directly.
More details, are on Google's documentation here .
*If you're updating your app following an update rejected or app removed from the Play Store, please read on instructions below as one more step is needed to send your new app version to review.
Update of your Android app following an update / app rejected or your app removed by Google
Depending on the your app's update status, it may not be sent for review automatically.
For example, if your app update was rejected and you've subsequently made changes in an attempt to resolve the issue, your changes aren't sent for review automatically.
Your new Android app version is now in Ready to send for review status.
You must go to the Publishing overview page and click Send for review to submit your changes.

- Android - Publication timeframe
- Android - Register for a Google Play Developer account (Mandatory)
- Android - Build your app and test the ad hoc version
- Android - Organization Google Play Developer account - First publication of your app in Google Play
- Android - Personal Google Play Developer account - First publication of your app in Google Play
- Android - Update your app in Google Play
- Android - Policy declarations about your App Content in Google Play
- Android - Find the Google Project ID using the Project Number
- Android - Distribute your app privately
- Android - Replace a published app with your new GoodBarber app
 Design